Thursday, September 27, 2012

Painted Toes and Pocket Holes- Teen Bed

I just wanted to post about my adventures in woodworking. After reading Shanty 2 Chic's blog about how she made her son's bedroom furniture I was inspired to make my own. My tween boy is growing like a weed and outgrew his bunk bed. We bought it when he was 4 and knew that the day would come when he'd no longer fit in it but was surprised at how quickly that came up.

Since he is a tween, I wanted to get him something that would last until he was finished with high school... unless he grows so long that the full sized bed doesn't work anymore (which means little brother will inherit his bed and I'll have to build another one). Anyway, the spark that set me off on the quest to build my own bed was this post at Shanty 2 Chic. I love the look of pottery barn but don't love the price tag. You know what I'm talking about, too! I get the catalogs and pour over the pages trying to figure out how I can get that look for less. ;)

My dad is great at carpentry and so I ran some questions by him before starting my project. I'm the kind of person who likes to gather up all the facts, costs, potential problems before starting  up a major project. I know some people like to dive right in and that's just not me, sorry. And I'm also a firm believer in getting the kids involved as a fun project to teach them something new and make memories. So, here are the pics of my son's bed:


I first started by building the frame. I had a few tools already but had to purchase a couple more. I had on hand a drill (which my husband had bought me for Christmas some years ago), a sander and some things like a tape measure, carpenter square, and hammer. The things i felt were necessary to purchase were a miter saw (chop saw) and a kregg jig. That put me at $200 before I even bought the lumbar.

Here's my son (who is receiving the bed) helping me to do the sanding on the frame we built. It was interesting to see how involved he wanted to be when using new power tools. I also found that I had to turn a blind eye to some of the cuts he made which could be off by 1/2". This was a learning process, right? :) So, when it came to the wood that I needed for the frame it was $70. Not too bad so far, right?

The stain and sealer cost less than $20 and was more than enough for both the frame and headboard. I ended up staining the whole frame but didn't take another pic later on once this dried. I just flipped the bed over and finished staining so that I wouldn't have any drip marks. The frame was super easy to make once I got used to using the tools.


Here is the headboard put together.  The materials for the headboard cost around $80. I ended up using up one of my scrap boards as a reinforcement in the middle of the headboard. The picture is looking at the back of it since there was a lot of attachments made from behind. Now, I will say this. I am going to be shopping for a nailer in the near future. My thumb took a beating during all of this.


Here is the finished bed. For around $400 dollars (which included the price of the tools that I can use on further projects) I was able to build this cool Pottery Barn knock off bed. And it's all solid wood, too!

Again, you can see some really great photos over at the Shanty 2 Chic blog, which also has a link for the plans to build this bed. The next thing I plan on building is a bookcase and two nightstands.

Thanks for checking me out!

Saturday, September 22, 2012

Update in Shop!

Autumn is officially here! I don't have to put off getting my fall decorations out any longer! It took a lot of self discipline on my part not to drag out my pumpkins and leaves and candles when stuff starting showing up in the stores - in JULY. I don't know about you but I feel like stores are rushing us through the seasons now. I like to celebrate them one at a time! And fall is my favorite!!!!

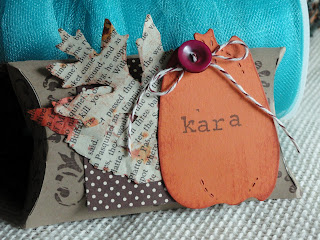
Anyway, I have a new TWeeK up in my shop, WinterBerry Glen. It is a pillow box set with autumn in mind. Pumpkins and leaves make this a kit that you can use the next few months for lots of gift giving ideas.

Here is a pic of my pumpkin pillow boxes all done up. Each kit comes with supplies to make cute gift packaging for 5 gift boxes.


There are also two different styles of pumpkins and buttons to choose from to make it mixy matchy. I am going to be giving these out right before Thanksgiving break to my little guy's teachers. I also think that they will make really cool place settings at our Thanksgiving dinner. I can write each person's name on the pumpkin and inside I can tuck some little treats.

I also sell the pillow boxes by themselves to be jazzed up for any type of gift giving.

Thanks for stopping by!

Teacher Gifts - for XC Coaches

I just wanted to show you some fun gifts that I made for my son's 3 teachers. They coached his cross country season and made the effort to be there at every single practice and game. That's 5 days a week after they put in a full day of teaching, folks. I think that deserves some recognition, don't you?


You'll have to excuse the lighting this time. It was late at night and I wanted to snap a few pics before I toted them off to school the next day to give away. And yes, I had to bring them because my 7th grade son said that they were too girly looking. He did sign the card so I guess that's all I can ask of a tween boy right now. ;)


Here is one more up close and personal. I took a paper sack that Made by Mish sells in her store and folded it almost in half. I sewed up the sides so that I could have extra pockets. Each gift came with a matching card, a matching notebook and Starbucks gift card. The pockets made plenty of space to easily fit those things plus more.


I took these into the front office and the ladies in there ooohhhed and ahhhhhed. It's nice when you can tell that people appreciate handmade gifts. I will have to make them some notebooks of their own for Christmas this year. ;)

Thanks for stopping by!

PS. If you are wondering about the papers I used, I got them in a kit over at Made by Mish's store. She is always updating her shop with fun kits and tags.

Sunday, September 9, 2012

Canning Peaches in Colorado


Hi, again. Just wanted to show you something fun I like to do at the end of summer - can peaches! There is a great little town in Palisades, CO, that has the best peaches ever. My friend and I bought a huge box that we split together. Those peaches were bigger than my fist!!!! We set to work canning them and even got my two boys involved in the process.

Once we were done with all our canning, we set to work on getting a cute presentation ready. We needed cute labels, cute lids and cute tags!
We used some labels that my friend bought along with her jars. We used alpha block stamps and a Lizzie date stamp so we would know when we canned the jam and butter. We also made some little gift tags that matched our lids. For the peach embellishments we used my cricut. I have some of those supplies in my etsy store in my Just Peachy TWeeK (Teensy Weensy Kit).


Each jar came out so mixy matchy and I love the homespun feel it gave me. Have you ever tried canning anything? Do you have a favorite recipe? This is only my 2nd year doing it but I'd like to do some more before the last of the fruits are gone for good.

Leave me a comment and let me know! Thanks for stopping by.

Monday, September 3, 2012

Just Peachy- Teensy Weensy Kit

I love giving hand made cards because I feel like i give a little of myself with it; my time, my creativity, and my feelings about the person receiving it. But life can be extremely busy and I don't always have the time to sit down and make a card. I try to customize each card that I send with that person in mind so that it has a lot of thought and meaning behind it. Yet there are times which don't afford me that luxury and I have to grab one from a stash that I have tucked away for those occasions.

That's why I love my teensy weensy kits; they give me the chance to mass produce cards but on a smaller scale. I wouldn't want all my friends receiving the same birthday card now would I?! And while I make a few batches of cards here and there I like to put some of them up in my shop for you, too. It gives you a chance to make a few cards when you have time and then have them ready to send out. You still get the opportunity to use your creativity and make a card but the cutting is done for you and it makes the assembly that much easier.

Wanna see what I mean? Okay, twist my arm... I'll show you! ;)
Here is one of the cards that I made using my Just Peachy TWeeK (teensy weensy kit). The cardstock that I use for this kit is a great quality and the patterned paper is Prairie Hill from Pink Paislee. Let me show you how I made this card using the kit items.
I used the pre-cut pieces and adhered them to the kraft front. The grid paper is just one long strip so that you can cut it however you want. I chose to make mine like a ribbon and snipped the ends in an upside down V. I also distress a lot of the pieces using ink.The chevron or zig-zag die cut is already cut out extra long so I measured it and cut it to size. After I laid the pieces out where I wanted them I went ahead and used my sewing machine to stitch them in place.

One of my favorite things to make are little tags. It's like a mini canvas on top of the card. I distressed my tag with ink but you don't have to. The sentiment banner and the aqua banner are both distressed already.

Next, I used some distress ink on my stitched peach. I also added an extra layer to mine for the middle. I trimmed the "whiskers" and used some pop dots on the back. Once adhered I made sure to fluff up all the layers to give it some dimension. I also added the button to the corner of the sentiment banner and stamped a flourish on the grid paper.
 Here's what comes in the kit. It's enough to make 4 cards; you just need to use scissors and adhesive. And a little imagination. ;)
I'll be posting something in a few days that will show you how else I used my Just Peachy TWeeK. A friend of mine came over and we spent the day making Peach Preserves and Peach Butter! We dressed up our tasty gifts with some fun tags.

Thanks for stopping in!

Sunday, September 2, 2012

Dog Days of Summer

Hello, friend. It seems like I'm in the dog days of summer. It is still really hot during the day and since a cold ran through the whole family this week we've been doing lots of laying around. Not what I had in mind for my Labor day weekend but it's nice to have the chance to recoup! And I don't know if it's just my perception but it seems like summer colds are the pits! Maybe even worse than the winter? I have a feeling that the kids are boosting up their immune systems once again now that school has been in session for two weeks. And, of course, they love to bring it home and share with the rest of us. ;)

I did have a little time this evening to get up into my craft room. The dishes can wait, right? So I made another teensy weensy kit as well as a few projects for some challenges. I started off with Retro Sketch #27 because having a good sketch helps me to get my ideas going when I've been absent on the craft seen for a bit. And I've been wanting to do this week's MIM #80 over at Papertrey Ink. It is a love note to all things bunting and I just adore it! Garlands, fabric bunting, felt, glitter.... just love it all. Since we haven't been well all week I had to use my time wisely when I got a few hours to play with my paper goodies. So my card is kinda simple but I hope you like it.

Here is the sketch that I followed:

I really had to take a bit to get the juices flowing. I was really excited to use up some Pink Paislee (Prairie Hill) paper since it was still laying on my desk. I had forgotten about it in the throws of Kleenex and crackers; it was such a nice surprise!

Here is a close up of the bunting/garland. I used Ashley's technique over at Papertrey to sandwich my twine between two layers of banners. I used Heart 2 Heart #6 to die cut those cute little flags (PTI). Then I used my Tiny Tim to staple the twine onto the fence. The fence die is from PTI and I stamped a light gingham background onto it to give it some pattern but not too much. I also distressed the fence and the bunting with Burlap Distress Ink. The kraft background I came up with out of necessity. It was my way of adding some sun rays to the focal point without having more patterns; I've got a lot going on with the card so I needed a landing place where the eye could rest a bit and yet still draw attention to the picket fence. The sentiment "for you" is from fillable frames and is generic enough to be a birthday card or thank you card.

Thanks for stopping by and I will be posting soon with a shop update and a new Teensy Weensy Kit.
Happy Labor Day for those of us who have the day off!!!!